
外观
Skip to content
最近优化了一个webpack4的项目,如果将代码的圈复杂度简化定义为代码中if、for、while、case、catch、&&(和)、||(或)、?:(三元运算符)的数量的话,这个项目业务代码的圈复杂度接近14000,属于不大不小的项目。
优化的思路和以前优化webpack3项目(圈复杂度40000+,相对大部分公司的项目而言,这已经算大型项目)差不多,但是配置的写法上有一些地方不一样,另外也发现了一些webpack4开始才有的东西,在此记录一下方便以后查找。
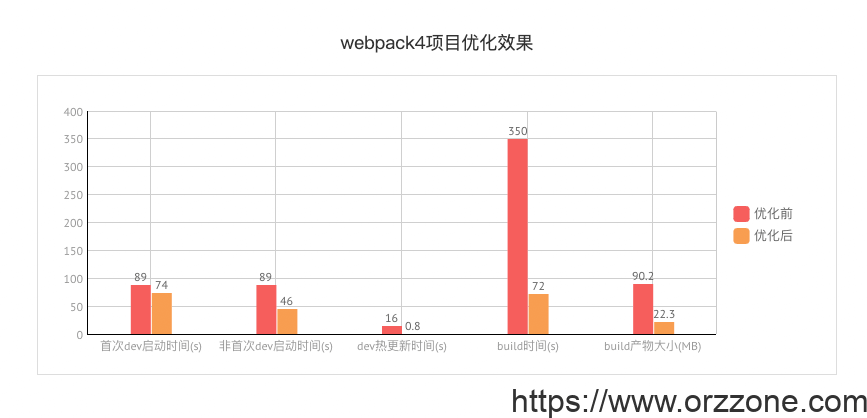
一、结论 本次优化前后核心数据对比结果见上图。其中最有意义的数据是以下三个:
- 【dev热更新时间】从16秒减少到不到1秒,降幅超过93%,显著提升了开发体验。
- 【build时间】从接近6分钟减少到1分12秒,降幅超过79%,提高了测试/产线环境的发布效率。
- 【build产物大小】从90.2MB减少到22.3MB,降幅超过75%,减少了用户本地需要下载的资源量(实际开启gzip压缩后用户整站需要下载的数据量只有4MB)。
二、主要优化内容
主要的优化点
- 减少无意义的资源引用。
- 合理设置webpackMode。
- 升级部分插件
- 升级node(只是提一下,考虑到风险,本次未升级node版本)。
- devtool的值注意一下
- 使用CDN、DLL
- 更换压缩插件
- 干掉SourceMap
- 提取公共代码
- 使用缓存 下面逐个详述。
2.1、减少无意义的资源引用(10星:效果拔群)
该方案对dev和build的编译时间,以及编译产物的大小,都有非常明显的优化,并且项目越大收益越明显,效果拔群,给10颗星星。
业务代码里使用import、require的时候要避免无意义的资源引用。尤其是在涉及变量的时候。举2个例子,可能你有个场景是需要展示一个和用户等级相关的图片的,然后接口下发了一个字段表示用户等级对应的图片名(图片保存在前端项目本地),然后你写了这么一段代码:
javascript
const levelImgName = res.data.userLevelImgName;
const imgLevel = require("@/images/" + level);这样webpack会去匹配 @/images 目录下的所有文件,如果你在images目录下放几百个图片进去,你会发现这份代码对应的编译产物文件会非常大。
不过大部分项目里图片目录下的文件可能也不多,所以很多人意识不到这个问题的存在。这个问题最明显的场景是vue或者react项目里咱们配置路由的地方,如果写的有问题,会对我们的编译时间(包括本地开发热更新的时间)、编译产物大小等都有很严重的影响。比如你的项目里这样写:
javascript
import { createRouter, createWebHistory } from "vue-router";
const pages = import.meta.glob("./pages/*");
const routes = Object.keys(pages).map((path) => {
  const name = path.match(/\.\/pages(.*)$/)[1].toLowerCase();
  return {
    path: name === "/home" ? "/" : name,
    component: pages[path],
  };
});
const router = createRouter({ history: createWebHistory(), routes });
export default router;然后如果实际的项目结构里,pages目录下除了页面源码文件,还有各种组件、图片等其他文件,就会对你的项目的带来很大的影响。这里需要大家能区分【编译时】(webpack构建时)和【运行时】(产物代码在用户浏览器上运行时)的区别。webpack的编译动作是发生在【编译时】的,不是发生在【运行时】的,它没法未卜先知,只能把所有可能会用到的资源都提前引入。
那么正确的做法应该是怎样的呢? 我们看下第一个例子,对于这种枚举值不多的情况,可以直接穷举:
javascript
const IMAGES = {
  level1: require("@/images/level1.png").default,
  level2: require("@/images/level2.png").default,
  level3: require("@/images/level3.png").default,
  level4: require("@/images/level4.png").default,
  level5: require("@/images/level5.png").default,
  level6: require("@/images/level6.png").default,
};
const levelNo = res.data.userLevelImgName.replace(/\.png$/, "");
const imgLevel = IMAGES[`level${levelNo}`];再看第二个例子,其实我们直接提供尽可能多的信息给webpack就可以了,它会把我们提供的信息转成正则然后去做对应的匹配(可以参考webpackt提供require.context这个API的目的),在下面的代码里我们提供的信息会让webpack只去找pages目录下以.page.vue为后缀名的文件,这样只要我们命名页面时都使用.page.vue作为后缀名即可(这里只要有个规则能将页面和非页面文件区分开来即可,比如可以约定每个目录下面的index.vue文件是页面,其他都是非页面文件,那也是可以的):
javascript
import { createRouter, createWebHistory } from "vue-router";
const pages = import.meta.glob("./pages/*/*.page.vue");
const routes = Object.keys(pages).map((path) => {
  const name = path.match(/\.\/pages(.*)\\.page\\.vue$/)[1].toLowerCase();
  return {
    path: name === "/home" ? "/" : name,
    component: pages[path],
  };
});
const router = createRouter({ history: createWebHistory(), routes });
export default router;实际这次优化时我碰到的是这样的,pages目录下有很多.vue文件,然后哪些是页面文件哪些是非页面文件并没有一个简单的规则可以区分,所以用不了上面说的方案。
javascript
import Vue from "vue";
import VueRouter from "vue-router";
function createRoute(name) {
  return {
    path: `/${name}`,
    name,
    component: () =>
      import(/* webpackChunkName: "[request]" */ `../pages/${name}`),
  };
}
const routes = [
  createRoute("pageName1"),
  createRoute("pageName2"),
  createRoute("pageName3"),
  createRoute("pageName4"),
  createRoute("pageName5"),
  createRoute("pageName6"),
  createRoute("pageName7"),
  // ...
  createRoute("pageName100"),
];
export default new VueRouter({ mode: "hash", routes });那怎么办呢?最后我弄的方案是写一个webpack loader将上面代码里routes数组里的那些 createRoute('blablabla') 的调用直接替换成具体的一个个配置,并把createRoute函数的定义给删掉(重要!不然就是徒劳),像下面这样(先忽略其中的webpackMode,后续章节里会提到,另外这个webpackInclude也具有缩小匹配范围的作用,并非无意义的注释):
javascript
const loaderUtils = require("loader-utils");
const handleSource = ({
  source,
  chunkNamePrefix,
  pathPrefix,
  routerFuncName,
}) => {
  /* eslint-disable */
  const jsonStr =
    ` { path: '/{{name}}', name: '{{name}}', component: () => import( /* webpackChunkName: "${chunkNamePrefix}{{name}}" */ /* webpackMode: "WEBPACK\_MODE" */ /* webpackInclude: /\\.vue$/ */ '@/pages/${pathPrefix}{{pathName}}' ), } `.trim();
  /* eslint-enable */
  // replace route config
  const replaceCallback = (matchText) => {
    const strRouteNameAndPathName = matchText.match(
      /(?<=\\(['"])(.*)(?=['"]\\))/,
    )[0];
    const arrRouteNameAndPathName =
      strRouteNameAndPathName.split(/['"]\\s*,\\s*['"]/);
    const routeName = arrRouteNameAndPathName[0] || "";
    const tempPathName = arrRouteNameAndPathName[1] || "";
    const pathName = tempPathName || routeName;
    return jsonStr
      .replace(/{{name}}/g, routeName)
      .replace(/{{pathName}}/, pathName);
  };
  source = source.replace(
    new RegExp(
      `(?<=^[\\\\sa-zA-Z\\\\[]*?)\\\\s*${routerFuncName}\\\\(['"].*?['"]\\\\)`,
      "gm",
    ),
    replaceCallback,
  );
  // remove createRoute function
  source = source.replace(
    new RegExp(
      `function ${routerFuncName}[\\\\s\\\\S]*?}[\\\\s\\\\S]*?}[\\\\s\\\\S]*?}[\\\\s\\\\S]*?}[;]?`,
    ),
    "",
  );
  return source;
};
module.exports = function (source) {
  try {
    const options = loaderUtils.getOptions(this);
    const resourcePath = this.resourcePath;
    if (!/\\.js/.test(resourcePath)) {
      return source;
    }
    /* replace route config: start */
    if (/[\\\\/]src[\\\\/]routes[\\\\/]index\\.js$/.test(resourcePath)) {
      source = handleSource({
        source,
        chunkNamePrefix: "",
        pathPrefix: "",
        routerFuncName: "createRoute",
      });
    }
    // replace webpackMode
    if (typeof options.replaceWebpackMode === "function") {
      source = options.replaceWebpackMode(source);
    }
    return source;
  } catch (err) {
    console.log(err);
    // eslint-disable-next-line
    process.exit(1);
  }
};然后在webpack配置里使用上面的loader(webpack-replace-loader就是上面代码对应的东西,记住这个loader要尽早触发):
javascript
export default {
  test: /\\.js$/,
  use: [
    {
      loader: "webpack-replace-loader",
      options: {
        replaceWebpackMode(source) {
          return source.replace(/WEBPACK_MODE/gm, isDev ? "eager" : "lazy");
        },
      },
    },
  ],
  include: ["/routes/index.js"].map(toSrcRoot),
  exclude: /node_modules/,
  enforce: "pre",
};至于webpack loader怎么写怎么引用这些本文不会涉及。 ### 2.2、合理设置webpackMode(6星:效果拔群) 该方案对dev本地开发时的热更新速度有明显提速(效果拔群),但对dev和build的编译时间以及编译产物大小没有什么帮助,解决不了资源冗余问题,给6星。 webpackMode在开发环境时可以使用eager替代默认的lazy。 在上面2.1节的尾部我们提到了webpackMode,这个东西一般大家也不会涉及到,正常我们做路由懒加载时,其实就是因为webpackMode的默认值是lazy,如果通过注释声明webpackMode的值为eager就不会有懒加载的效果了。产线我们还是要用lazy(懒加载),但是开发环境就没必要这样,替换成eager可以显著提高dev本地开发时热更新的速度。 ### 2.3、升级部分插件(3星:效果一般) html-webpack-plugin插件的版本由v3升级到v4。这个主要是热更新时发现每次快到最后的时候都会停一下,然后终端里显示的是html-webpack-plugin的信息,网上查了下发现3升级到4可以有明显的提速,所以强烈推荐升级一下。 其他没必要升级的我也尝试升级了下,最后发现这样还是容易有风险,后面又改回去老版本了,只对确实本对此优化有效果的插件才升级,所以只升级了html-webpack-plugin。 ### 2.4、升级node(2星:效果不定) 如果当前node版本和升级后的node版本之间存在某个性能提升对webpack的编译速度有巨大帮助的话,会有很大的收益,否则没啥帮助。 另外要考虑升级的风险,如果不做业务回归测试的话,不建议升级,除非项目很小自己点点就可以测好。 ### 2.5、devtool的值注意一下(3星:效果一般) 如果不用SourceMap的话,不配值或者传eval可以提速较多。 ### 2.6、使用CDN、DLL(1星:效果一般) 如果有多个项目(或者使用了微前端方案),使用CDN/DLL后可以考虑一些缓存带来的用户体验的优化。 ### 2.7、更换压缩插件(4星:效果较好) 使用terser-webpack-plugin替换uglifyjs-webpack-plugin,并开启parallel选项并行编译。
javascript
const TerserPlugin = require("terser-webpack-plugin");
export default {
  // other code
  optimization: {
    // other code
    minimize: true,
    minimizer: [
      new TerserPlugin({
        include: toSrcRoot("/"),
        exclude: [/\\/node_modules/],
        // default parallel nums:os.cpus().length - 1
        parallel: true,
        terserOptions: {
          ecma: 5,
          sourceMap: false,
        },
      }),
    ],
  // other code
  },
  // other code
};2.8、干掉SourceMap(5星:效果好)
去掉SourceMap对build提速和产物大小的优化都是比较明显的。有同学可能会觉得这样产线上的错误上报里的报错信息就不明确了。但一般我们搞错误上报都是弄成那种简单请求,每次上报时上传的数据量是有限的,上传压缩后的代码报出来的错,虽然降低了报错信息的可读性,但是可以让你单位信息长度里包含的信息密度更高,焉知非福?另外从报错位置(行列号)我们是从编译产物里找到具体的代码上下文来定位报错内容对应的源码的。
2.9、提取公共代码(5星:效果好)
这个方案对优化产物总体积效果明显,给5星。
splitChunks除了把第三方库抽出来,对项目里一些有复用性的代码也抽一下(将minChunks属性的值设定为一个大于等于2的值)。除了minChunks属性外,priority属性也值的我们注意,像下面的例子里src/components里的东西会被打包到chunk-utils里而非chunk-commons里,就是因为utils-utils对应的priority值更高,有更高的优先级。
javascript
const config = {
  splitChunks: {
    chunks: "all",
    minSize: 30000,
    minChunks: 1,
    maxAsyncRequests: 5,
    maxInitialRequests: 3,
    automaticNameDelimiter: "-",
    name: true,
    cacheGroups: {
      utils: {
        name: "chunk-utils",
        test: /[\\\\/]src[\\\\/](components|utils|services)/,
        priority: 8,
        chunks: "all",
        minChunks: 2,
      },
      commons: {
        name: "chunk-commons",
        test: /[\\\\/]src/,
        priority: 4,
        chunks: "all",
        minChunks: 2,
      },
      libs: {
        name: "chunk-libs",
        test: /[\\\\/]node_modules[\\\\/]/,
        priority: 10,
        chunks: "all",
      },
      elementUI: {
        name: "chunk-element-ui",
        priority: 20,
        test: /node_modules(.+)element-ui/,
      },
    },
  },
};2.10、使用缓存(1星:效果一般)
babel-loader可以开启缓存。这个方案建议只是本地dev开发时开启,因为这个方案会增加一定的IO操作(要将数据缓存到本地供后续读取),可以理解为牺牲首次编译的时间换取后续编译的提速。